CSV Exporter for Shopify, Magento & Custom Formats
Seamlessly Generate CSV Files for a Subset of Products
Our new CSV Exporter feature allows you to effortlessly generate CSV files tailored to the
Shopify, Magento,
PS-JSON & Custom formats.
This powerful tool enables you to select a specific subset of products from your supplier's
catalog and export the data with ease.
If you are using Shopify you should check the PromoSync App documentation to learn how to use our APP.
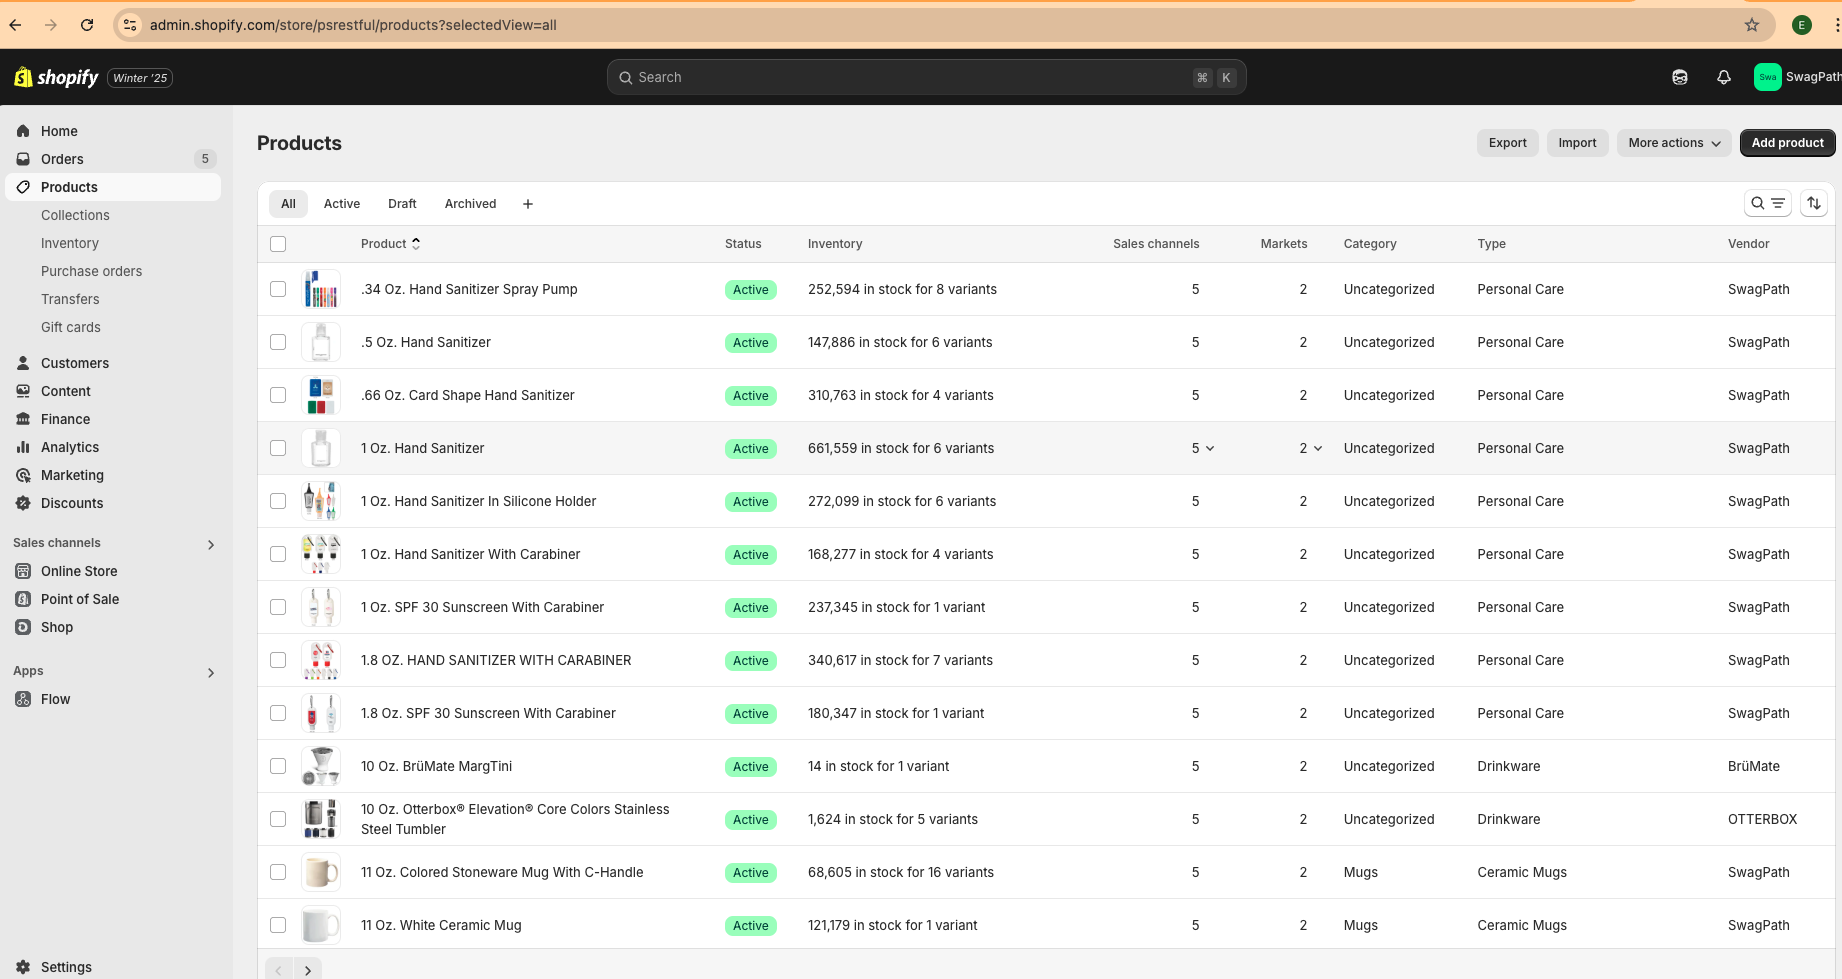
Example of a Shopify store populated using this feature: SwagPath.com
Index
- Demo
- Key Features
- Information per Format
- How to import CSVs into Shopify
- How to enforce minimum quantity using the metafield
- How to create the metafields using a Python script
- How to update the inventory using a python script
- How to obtain Shopify API Credentials for your Python script
Screenshot:
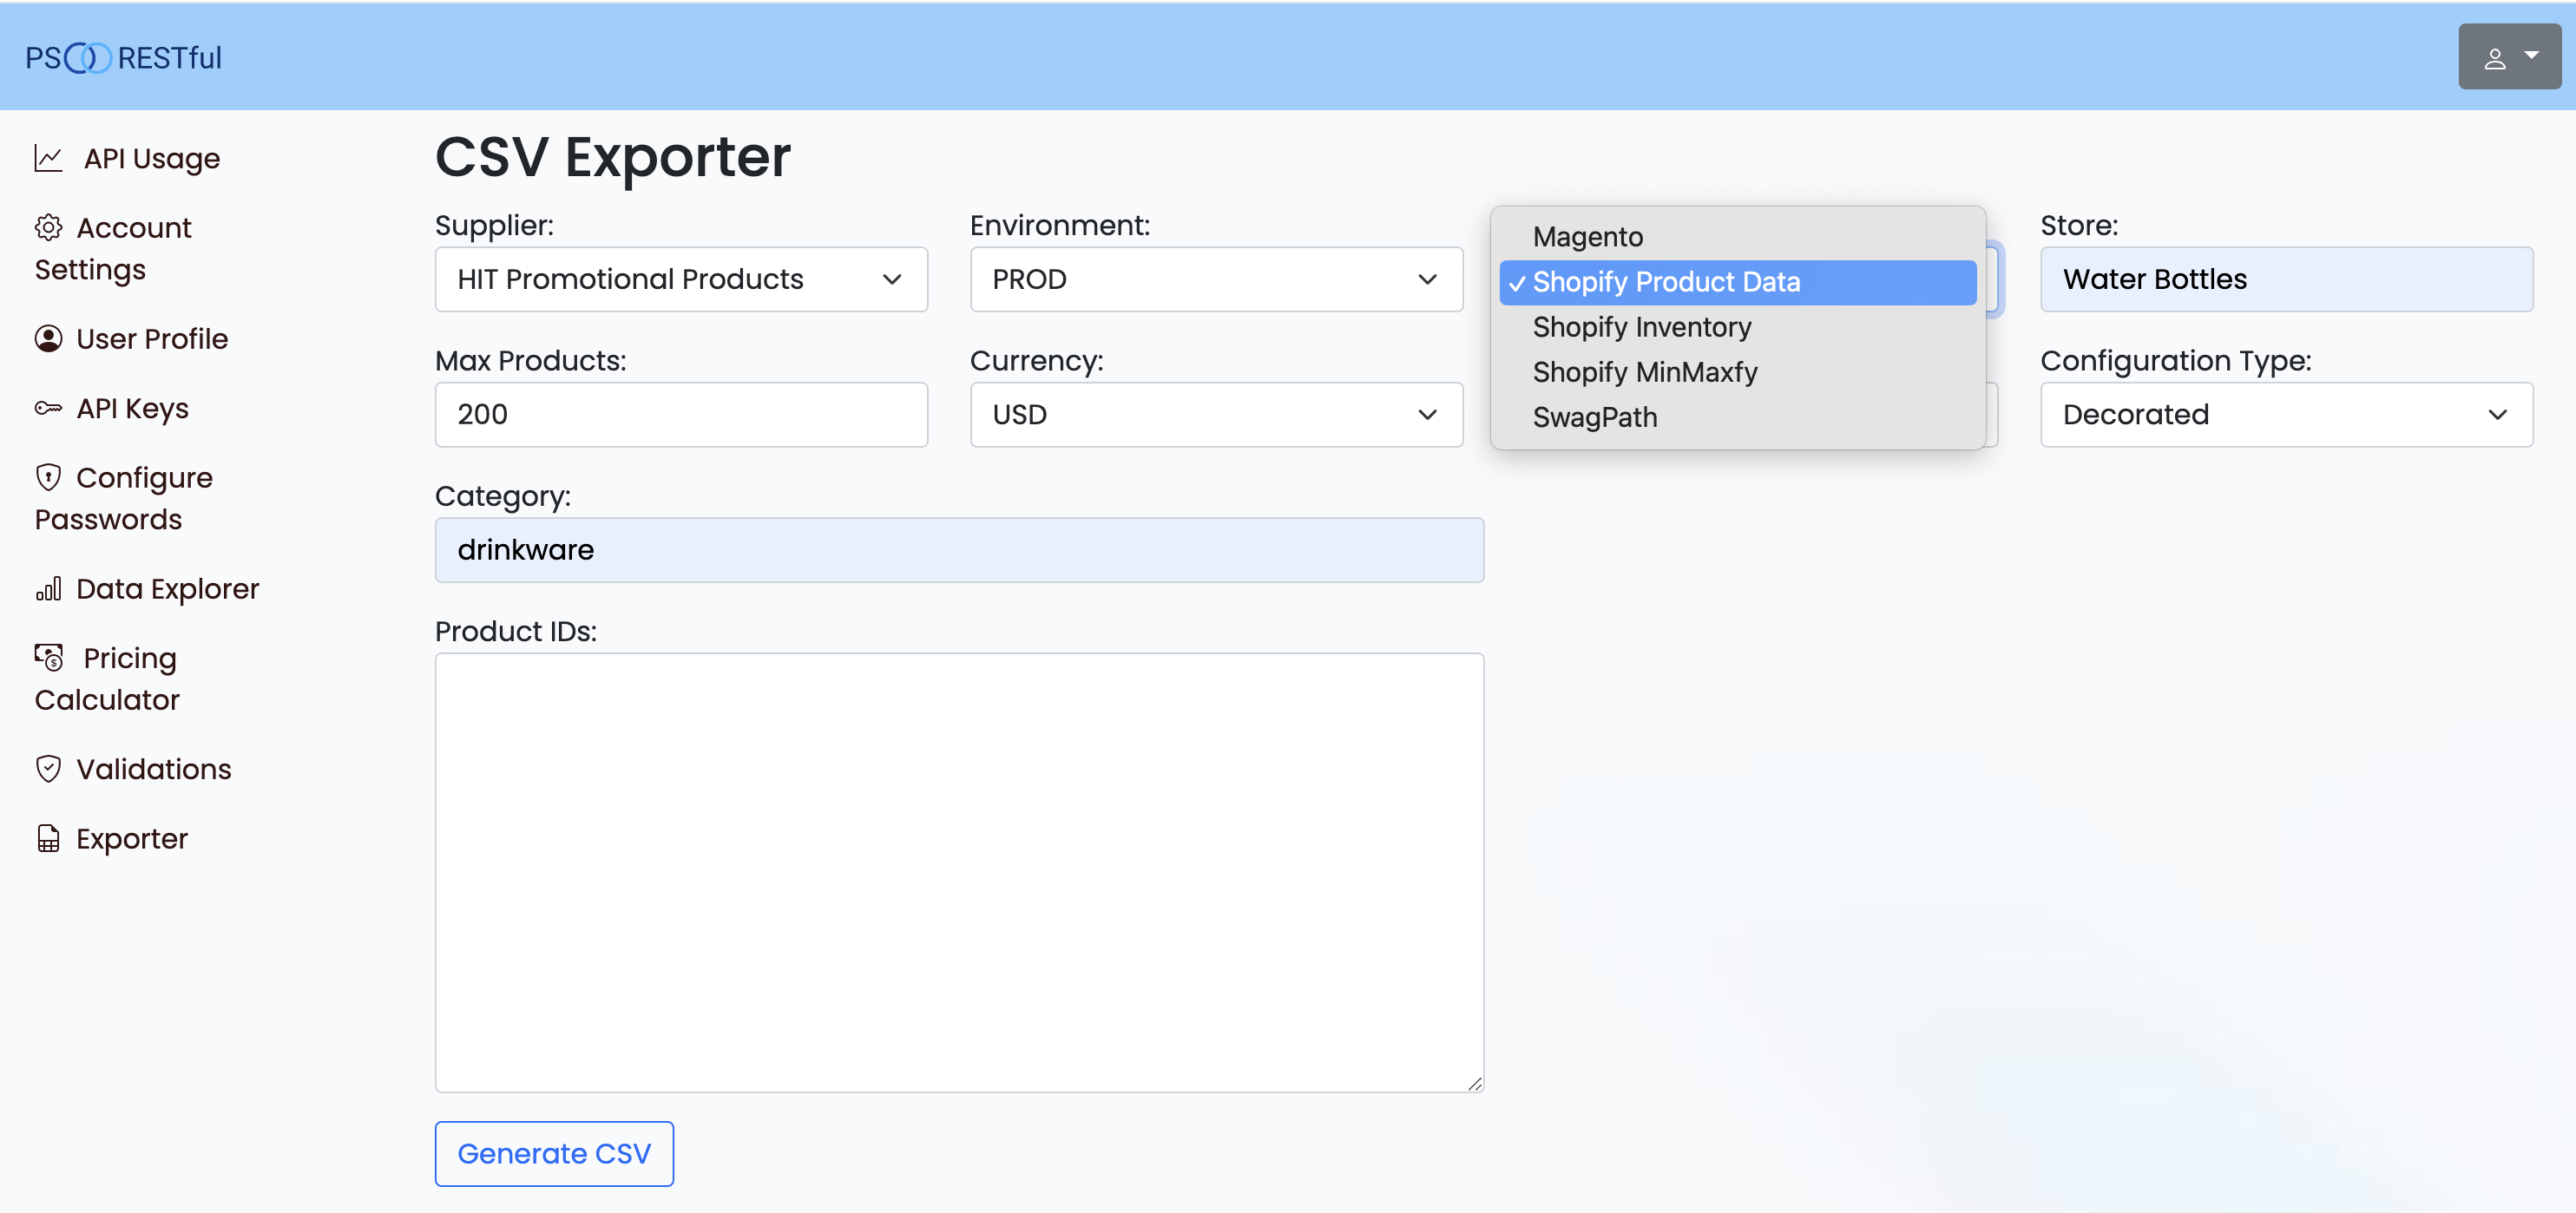
Demo:
Key Features:
- Supplier Selection: Choose your desired supplier from the drop-down menu to filter products. After selecting a supplier, the Category field will be populated with the possible options.
- Environment Setting: Switch between different environments (PROD, STAGING) for accurate data extraction. Most of the time PROD would be the preferred option.
- Format Options: Currently supporting the Magento, Shopify Product,
Shopify Inventory, and
Shopify MinMaxfy formats, with more formats to be
added soon.
The Shopify Product option doesn't return any inventory because you can use Shopify Inventory to update your inventory any time you like.
If your platform is not here, you can request a Custom format. - Store Name: Input store name to customize the CSV output (tier_prices or vendor id productBrand is not available).
- Currency Selection: Select the currency in which the product prices will be displayed. USD and CAD are the only available options but it depends on the supplier.
- Price Type: Choose between different price types such as Net or List. List Price is the one that make most sense because it is the price the user sees on Supplier's website.
- Configuration Type: Specify the configuration type, like Decorated or Blank. Remember, some products only sells blank, so the Decorated option will not return any products. And some products can only be sold in decorated. Please, use the Data Explorer to check the Product Configuration.
- Category Filter: Narrow down the product list by selecting specific categories.
Not needed when you know exactly what products IDs you want to export.
Sometimes Suppliers don't use Product Category in Product Data, so the autocomplete will not work, however you can still use keywords to filter the products if they happen to fill the Product Keyword Array field. - Product IDs: Directly input product IDs to generate a precise subset of products.
It can be a comma separated list of product IDs or even with line breaks.
Useful when copying & pasting from supplier's bestsellers spreadsheets. - Import Tag: A name you will use to describe what you are exporter/importing.
- Status: Refers on how you want to product to start: Draft or Active
Powered by Latest Standards:
This feature leverages the latest Product Data version 2.0.0 and Media Content version 1.1.0, ensuring you get the most accurate and up-to-date information in your CSV exports.
Examples:
| Supplier | Environment | Category | Format | Link |
|---|---|---|---|---|
| Ariel Premium Supply | PROD | Drinkware | Magento | Download |
| Hit Promotional Products | PROD | Few selected products | Shopify Product | Download |
| Hit Promotional Products | PROD | Few selected products | Shopify Inventory | Download |
| Ariel Premium Supply | PROD | Few selected products | Shopify MinMaxfy | Download |
Information per Format
The Shopify Product format is a CSV file useful for importing & updating your
products on Shopify store.
It will contain the following columns:
- Handle
- Title
- Body (HTML)
- Vendor
- Type
- Tags
- Published
- Option1 Name
- Option1 Value
- Option2 Name
- Option2 Value
- Variant SKU
- Variant Grams
- Variant Fulfillment Service
- Variant Price
- Variant Image
- Variant Requires Shipping
- Variant Taxable
- Image Src
- Image Position
- Image Alt Text
- Gift Card
- SEO Title
- SEO Description
Some Meta fields for product:
- product.metafields.psrestful.price_expires_date
- product.metafields.psrestful.brand
- product.metafields.psrestful.is_caution
- product.metafields.psrestful.caution_comment
- product.metafields.psrestful.line_name
- product.metafields.psrestful.unspsc_commodity_code
- product.metafields.psrestful.imprint_size
- product.metafields.shopify.default_setup_charge
- product.metafields.shopify.default_run_charge
And some Meta fields for Variant:
- variant.metafields.psrestful.variant_primary_material
- variant.metafields.psrestful.variant_is_rush_service
- variant.metafields.psrestful.variant_lead_time
- variant.metafields.psrestful.variant_is_caution
- variant.metafields.psrestful.variant_caution_comment
- variant.metafields.psrestful.variant_is_on_demand
- variant.metafields.psrestful.variant_is_hazmat
- variant.metafields.psrestful.variant_shape
- variant.metafields.psrestful.variant_unspsc
- variant.metafields.psrestful.variant_nmfc_code
- variant.metafields.psrestful.variant_nmfc_description
- variant.metafields.psrestful.variant_nmfc_number
- variant.metafields.psrestful.variant_country_of_origin
- variant.metafields.psrestful.variant_gtin
- variant.metafields.psrestful.variant_dimension_unit
- variant.metafields.psrestful.variant_dimension_depth
- variant.metafields.psrestful.variant_dimension_height
- variant.metafields.psrestful.variant_dimension_width
The Shopify Inventory format is a CSV file for updating your inventory on
Shopify store.
The last column is Location, you should change your Location in Shopify to be
named Default to match the CSV file.
It will contain the following columns:
- Handle
- Title
- Option1 Name
- Option1 Value
- Option2 Name
- Option2 Value
- Option3 Name
- Option3 Value
- SKU
- Incoming (not editable)
- Available (not editable)
- On hand (new)
- Unavailable (not editable)
- Location We use Default here.
The Shopify MinMaxfy format is a CSV file that contains the following columns:
- Handle
- Title
- Min
- Max
- Multiple
It is a CSV for the MinMaxfy App used to set the minimum and maximum quantities for a product. The Multiple column is used to set the quantity increment. So we defaulted to 1.
Here is their documentation for the file.
The Shopify Order Logic format is a CSV file for updating your Order Logic information on Shopify store.
It will contain the following columns:
- title
- minimum
- maximum
- multiple
It is a CSV for the Order Logic App used to set the minimum and maximum quantities for a product. The Multiple column is used to set the quantity increment. So we defaulted to 1.
Here is their developer page.
The Shopify Bold Commerce format is a CSV file for updating your Bold Commerce app information on Shopify store.
It will contain the following columns:
- Handle
- Variant SKU
- QTY
- Price Type
- Variant Price
It is a CSV for the Bold Commerce App used to set tier pricing for a product.
Here is their CSV explanation.
The Magento format is a CSV file that contains the following columns:
- sku
- name
- description
- short_description
- product_type
- categories
- attribute_set_code
- color
- size
- source
- brand
- price
- visibility
- min_cart_qty
- capacity
- production_time
- base_image
- small_image
- thumbnail
- tier_prices
- configurable_variations
- configurable_variation_labels
- status
- _store
- website_id
- manage_stock
- is_in_stock
- product_websites
- keywords
- imprint_size
- primary_material
- is_rush_service
- gtin
- dimension_uom
- depth
- height
- width
- weight
Easily bring your product catalog to any platform with our new PS-JSON export format. Unlike traditional CSV files, PS-JSON delivers a complete, structured dataset that’s ready for seamless imports and updates into virtually any system or online store.
Each export combines everything you need from both the Product Data and Media Content Services—ensuring your product listings are always accurate, consistent, and enriched with images and details.
This custom exporter will be tailored to your e-commerce platform, will contain the columns you need, and will be only available to your account.
How to import your CSV into Shopify
Once you download the CSV from PSRESTful you can start the process to import it into your Shopify store.
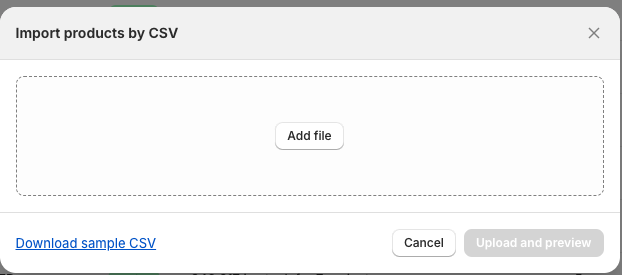
Here are the steps to import your CSV (exported from PSRESTful) into Shopify:
- Go to your store admin page
-
Click on Products menu
-
Click on Import Button
-
Add your CSV file by clicking on Add file Button and selecting the file
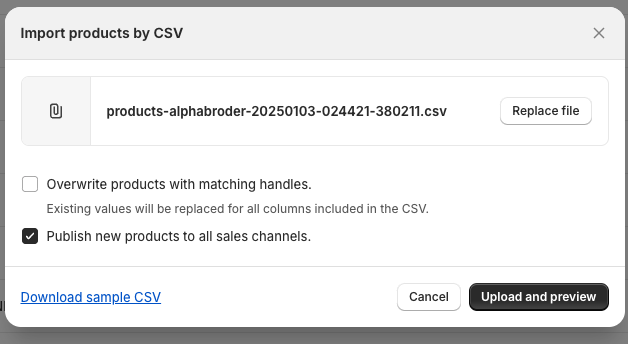
If you already imported those products then you should click on the Overwrite checkbox, so the new data takes place.
-
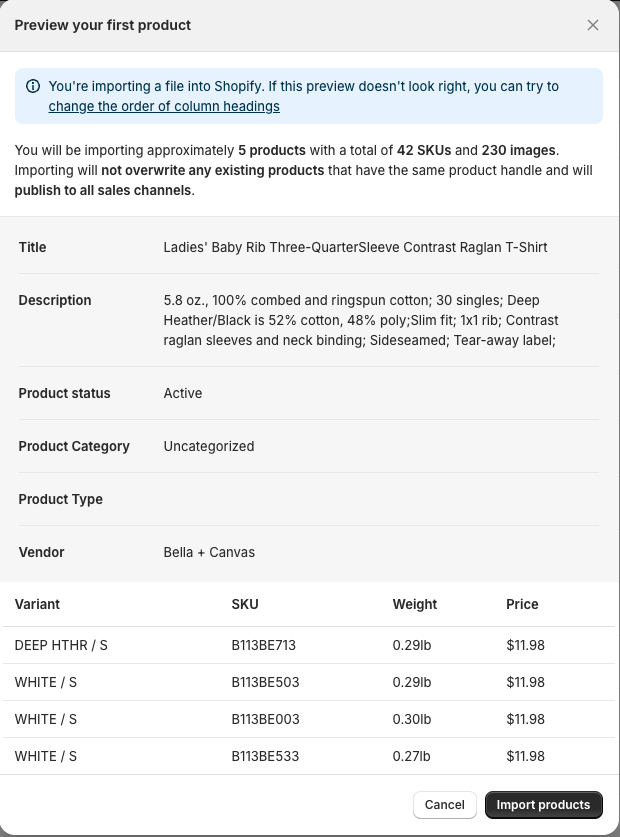
Click on Upload and preview Button and you should see a Preview similar to the following image
- Once you click on Import Products Button, the process will start. You will receive a notification once the process is done.
Remember, you need to add metafields in your Shopify store to get maximum benefits from using our CSV Exporter.
The CSV does not include inventory information because we offer a separate format for that. If you prefer, you can update your inventory manually or create a script to automate frequent updates using your metafields for supplier, product ID, PartID, and our API.
How to enforce minimum quantity using the metafield
Forcing minimum quantity only using metafield and a minimal change on main-product.liquid. No need to add rules or anything else.
How does it work
- Create the minimum_quantity metafield in Product object.
- Modify the main-product.liquid to use the field.
The CSV will return a column called minimum_quantity, this field can be accessed in Shopify liquid by
product.metafields.psrestful.minimum_quantity
after you create this metafield in Shopify.
To modify the main-product-liquid file:
- Look for an input with
id="Quantity-{{ section.id }}" -
Before the div with class
price-per-item__containerplace this code:{%- assign min_qty = product.metafields.psrestful.minimum_quantity -%}This will allow you to use min_qty later in the liquid template.
-
Then, focus on the input. You need to modify/add data-min, min, and value.
        <input
            class="quantity__input"
            type="number"
            name="quantity"
            id="Quantity-{{ section.id }}"
            data-cart-quantity="{{ cart_qty }}"
            data-min="{{ min_qty }}"
            min="{{ min_qty }}"
            {% if product.selected_or_first_available_variant.quantity_rule.max != null %}
            data-max="{{ product.selected_or_first_available_variant.quantity_rule.max }}"
            max="{{ product.selected_or_first_available_variant.quantity_rule.max }}"
            {% endif %}
            step="{{ product.selected_or_first_available_variant.quantity_rule.increment }}"
            value="{{ min_qty }}"
            form="{{ product_form_id }}"
        >
With these easy changes you will prevent orders below the minimum quantity and use PSRESTful and the supplier data to fill out the fields.
How to create metafields using a Python script
Save time by using a Python script to add our metafields
When you need to add metafields to your Shopify store, you can use a Python script to automate the process. This is especially useful when you have a large number of products or need to update the metafields frequently.
How does it work
We've open-sourced a Python script that simplifies adding metafields to your Shopify store via the Shopify API. Shopify-psrestful has its own readme file to help developers to use it.
Here is a piece of code to illustrate:
@dataclass
class Spec:
    name: str
    key: str
    description: str
    field_type: str = 'single_line_text_field'
    owner_type: str = 'PRODUCT'


SPECS = (
    # product
    Spec(name='Supplier Code', key='supplier_code', description='Supplier Code', field_type='single_line_text_field'),
    Spec(name='PS Product ID', key='product_id', description='Product ID from PromoStandards',
         field_type='single_line_text_field'),
    Spec(name='Extra ID', key='extra_id', description='Extra ID from PSRESTful API', field_type='number_integer'),
    Spec(name='Effective Date', key='effective_date',
         description='The Date this Product initially becomes available from the Supplier in ISO 8601 format',
         field_type='date'),
    Spec(name='Export', key='export', description='Product status for export', field_type='boolean'),
    Spec(name='Primary Material', key='primary_material', description='Primary material of construction',
         field_type='single_line_text_field'),
    Spec(name='Brand', key='brand', description='Brand of the Product', field_type='single_line_text_field'),
    Spec(name='Country of Origin', key='country_of_origin', description='Country of Origin of the Product',
         field_type='single_line_text_field'),
    Spec(name='Is Caution', key='is_caution',
         description='Cautionary status to review for specific warnings about using product data.',
         field_type='boolean'),
    Spec(name='Caution Comment', key='caution_comment', description='Caution', field_type='boolean'),
    Spec(name='Line Name', key='line_name', description='Line Name / Division to which this product belongs',
         field_type='single_line_text_field'),
    Spec(name='Minimum Quantity', key='minimum_quantity', description='Minimum quantity to order',
         field_type='number_integer'),
    Spec(name='Lead Time', key='lead_time', description='Lead time in days', field_type='number_integer'),
    Spec(name='Is On Demand', key='is_on_demand', description='Product is available on demand', field_type='boolean'),
    Spec(name='Is Rush Service', key='is_rush_service', description='Product is available as a rush service',
         field_type='boolean'),
    Spec(name='Imprint Size', key='imprint_size', description='The imprint Size', field_type='single_line_text_field'),
    Spec(name='Price Expires Date', key='price_expires_date', description='The Date this Product price expires',
         field_type='datetime'),
    Spec(name='Is Hazmat', key='is_hazmat', description='Contains hazardous material. A nil value indicates this it'
                                                        'is unknown or the data is not available by the supplier',
         field_type='boolean'),
    Spec(name='Price Expires Date', key='price_expires_date',
         description='The date that the pricing in the ProductPriceGroupArray portion of the response expires',
         field_type='datetime'),
    Spec(name='Default SetUp Charge', key='default_set_up_charge',
         description='The default setup charge for this product. Can be a textual description',
         field_type='single_line_text_field'),
    Spec(name='Default Run Charge', key='default_run_charge',
         description='The default RUN charge for this product. Can be a textual description',
         field_type='single_line_text_field'),
    Spec(name='UNSPSC Commodity Code', key='unspsc_commodity_code',
         description='The United Nations Standard Products and Services Code® (UNSPSC®) that best describes this '
                     'product. Note that the enumerated values are the UNSPSC "Commodity" codes. For more information, '
                     'refer to https://www.unspsc.org',
         field_type='number_integer'),
    # Variant
    Spec(name='Variant GTIN', key='variant_gtin', description='Global Trade Item Number',
         field_type='single_line_text_field', owner_type='ProductVariant'),
)


def create_meta_fields_from_specs(shopify_domain, access_token, meta_field_specs=SPECS):
    with get_shopify_session(shopify_domain, access_token):

        for spec in meta_field_specs:
            create_metafield(spec.name, spec.key, spec.description,
                             field_type=spec.field_type, owner_type=spec.owner_type)


def create_metafield(name: str, key: str, description: str,
                     namespace: str = 'psrestful',
                     field_type: str = 'single_line_text_field', owner_type: str = 'PRODUCT'):
    query = '''
    mutation CreateMetafieldDefinition($definition: MetafieldDefinitionInput!) {
      metafieldDefinitionCreate(definition: $definition) {
        createdDefinition {
          id
          name
          namespace
          key
          description
        }
        userErrors {
          field
          message
          code
        }
      }
    }
    '''
    variables = {
        "definition": {
            "name": name,
            "namespace": namespace,
            "key": key,
            "description": description,
            "type": field_type,
            "ownerType": owner_type
        }
    }

    response = shopify.GraphQL().execute(query, variables)
    return response
How to update inventory using a Python script
Avoid checkout issues by updating your inventory using a Python script
Shopify-PSRESTful
We have created another command in the open source code located at Github. The update-inventory command will help you to keep your inventory up to date. This is a CLI tool to help with the integration of Shopify and PSRESTful, and it is meant to be used as a standalone tool but in combination with the CSV Exporter in PSRESTful.
If you already have products in your store and want to update the inventory, you just need to add the metafields
supplier_code and
product_id
to your products. Then, you will be ready to update inventory using this script.
Deployment
You should use a machine where you can run Python. If using Linux use a cronjob. For most cases, running the script once a day is enough. Remember, you will be hitting your Shopify store, PSRESTful, and the supplier. After midnight is a good time to run the script.
Depending on the number of products in your store this can be a slow process. This is why it is recommended to run it in background. We have also included a retry logic to avoid rate limit errors.
nohup ./src/shopify_psrestful/cli.py -c update-inventory &How to Obtain Shopify API Credentials for Your Python Script
1. Create a Shopify App
Shopify provides two ways to create an app: Custom Apps and Public Apps. If you're building an integration for your own store, use a Custom App.
Steps to Create a Custom App:
- Log in to your Shopify Admin panel.
- Navigate to Settings > Apps and sales channels.
- Click on Develop apps (If this option is disabled, enable it by clicking "Allow custom app development").
- Click Create an app and provide a name for your app.
- Click Create app.
2. Get API Credentials
Once the app is created, retrieve the necessary API credentials:
- Go to the API credentials tab.
- Copy the Admin API Access Token (this is your
SHOPIFY_APP_PRIVATE_APP_PASSWORD). - Copy the API Key and API Secret Key (needed for authentication).
-
Under Admin API scopes, grant the necessary permissions, then click
Save and Install app.
Metafields Permissions:
- write_metafields: Required to create and update metafields.
- read_metafields: Required if you also need to retrieve existing metafields.
Inventory Permissions (Stock Updates):
- write_inventory: Required to update inventory levels.
- read_inventory: Required if you need to retrieve current stock levels.
- write_products: Required if updating inventory involves modifying product variants.
- read_products: Needed if you need to fetch product details before updating stock.
3. Find Your Shopify Store URL
Your store URL follows this format:
https://{your-store-name}.myshopify.comUse this value for SHOPIFY_APP_SHOP_URL.
4. Set Up Your .env File
Create a .env file in your project directory and add the credentials:
SHOPIFY_APP_API_KEY='your_api_key'
...